Transplanting
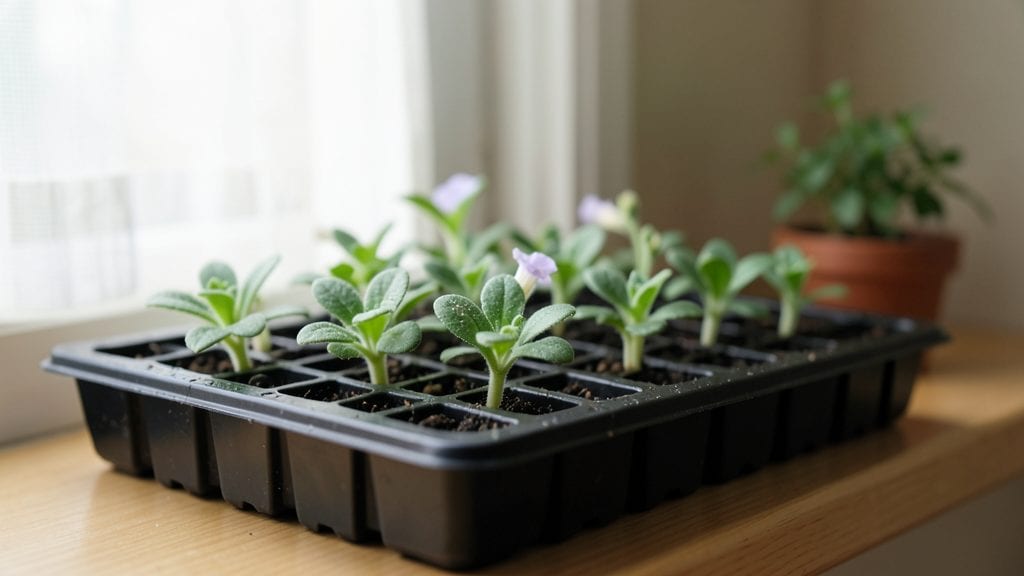
Before you transplant, study these petunia seedlings images to spot the sturdy, vibrant stems that guarantee a lush summer display—leggy, pale ones won’t recover, trust me. 🌱 green leaves, and roots that fill the container.
These are the visual cues that separate thriving plants from those that’ll flop after moving outside.
The first stage to watch for is when seedlings develop their second set of true leaves—those thick, rounded leaves that replace the initial seed leaves. By this point, they should be about 2–3 inches tall with no signs of yellowing or stretching.
Healthy seedlings also have a compact shape, not stretched-out stems that’ll snap in wind or rain. If you see dark spots or fuzzy mold, that’s a red flag for disease.
Once you’ve picked the winners, it’s time to harden them off—gradually exposing them to outdoor conditions over 7–10 days. Start with a few hours of morning sun, then increase their time outside daily.
By transplanting at this stage, you’ll get petunias that fill in quickly, bloom prolifically, and handle heat and humidity like champions.
This method works for both annual petunias and those grown from seed each spring. The key is acting fast once you spot those strong seedlings—before they outgrow their containers or get overwhelmed by pests. Let’s get those babies ready for their big move!
📚 In This Guide
- What you need
- Instructions
- Tips and common mistakes
- Wrapping up and next steps
What you need
- ● Petunia seeds: Choose high-quality, disease-resistant varieties (e.g., Petunia × hybrida). Aim for 50–100 seeds depending on your desired yield.
- ● Seed-starting trays or pots: Biodegradable or plastic cell packs (2–4 inches deep) or small pots (3–4 inches in diameter). 10–20 cells/pots should suffice.
- ● Seed-starting mix: A lightweight, sterile soilless mix (e.g., peat moss + perlite or coconut coir). Avoid garden soil—it’s too dense!
- ● Grow lights or sunny windowsill: A full-spectrum LED grow light (12–16 hours/day) or a south-facing window with 6+ hours of sunlight.
- ● Spray bottle: For gentle watering (avoid over-saturating seeds).
- ○ Plastic wrap or humidity dome: To retain moisture until germination (optional but helpful).
- ● Fertilizer: A balanced liquid fertilizer (e.g., 10-10-10 or fish emulsion) diluted to half-strength for seedlings.
- ● Labels & markers: To track seed varieties and planting dates.
- ● Heating mat ($10–$20) to speed up germination in cooler climates.
- ● Fungicide (e.g., neem oil or copper-based) to prevent damping-off disease.
- ● Pruning shears for trimming leggy seedlings.
- ● Grow bags or larger containers for transplanting once seedlings outgrow their starter pots.
- ● Camera or phone for documenting petunia seedlings images at each growth stage!
How to identify healthy petunia seedlings before transplanting
Here's how to spot strong, thriving petunia seedlings—no guesswork involved.
🌱 Step 1: Check for Proper Germination and Cotyledons
Healthy petunia seedlings start with two small, rounded leaves called cotyledons. These appear first, usually within 7-14 days after sowing, depending on warmth and moisture. If your seedlings look pale or yellowish at this stage, they’re not getting enough light—move them closer to a sunny window or under grow lights.
I always check for even spacing between seedlings. If they’re crowded, thin them out early to prevent competition. You’ll see strong seedlings have sturdy stems and cotyledons that stand upright, not wilted or curled. Weak seedlings often collapse or develop black spots—this means damping-off is setting in, and you’ll need to adjust watering or improve airflow.
🌿 Step 2: Look for True Leaves and Compact Growth
Once the first true leaves appear (these look like tiny petunia flowers but are actually the plant’s first real foliage), your seedlings are ready for closer inspection. Healthy true leaves are deep green, slightly fuzzy, and grow in pairs. If leaves are yellowing or have brown edges, your seedlings are either overwatered or lack nutrients.
I pinch off any leggy stems—those long, thin stems reaching toward light. Leggy seedlings won’t survive transplanting well. Instead, you want seedlings that are 2-3 inches tall with a thick stem and leaves close together. This tells you the plant is strong and ready for its next growth phase.
✂️ Step 3: Assess Root and Stem Strength
Gently tug on a seedling’s stem to test its strength. If it pulls out easily with little resistance, it’s not ready for transplanting. Healthy roots should hold firm when you give a gentle tug—this means the root system is developing properly. If roots are sparse or mushy, the seedling needs more time or better growing conditions.
I also check the stem’s thickness. A pencil-sized stem at the base is ideal. Thin stems mean the seedling isn’t getting enough light or nutrients. At this stage, you’ll also notice small buds forming at the base of the plant—this is a good sign the petunia is maturing and preparing for flowering.
💧 Step 4: Monitor Water and Soil Conditions
Healthy petunia seedlings thrive in soil that’s moist but not soggy. Stick your finger ½ inch deep into the soil—if it feels dry, it’s time to water. Overwatering is the biggest mistake here; it causes roots to rot and stems to weaken. I water from the bottom of the tray to encourage roots to grow downward instead of sitting in pooled water.
Look for signs of stress: wilting leaves, yellowing, or a glassy appearance on the soil surface. These are red flags. If your seedlings are in small containers, they’ll dry out faster. Move them to a slightly larger pot or tray if you notice the soil drying out too quickly.
☀️ Step 5: Prepare for Transplanting with Light and Airflow
The final check is ensuring your seedlings are hardened off and ready for their new home. Place them in a spot with 4-6 hours of sunlight daily for a week before transplanting. You’ll see them develop a deeper green color and stronger stems. Avoid placing them in direct midday sun too soon—it can scorch tender leaves.
I also increase airflow around the seedlings by spacing them out or using a small fan on low setting. This toughens their stems and prepares them for outdoor conditions. When you’re ready to transplant, choose a cloudy day to reduce shock. Healthy seedlings will bounce back quickly and start blooming within weeks.
Tips & tricks for identifying healthy petunia seedlings
Here's what I've learned after growing dozens of petunia batches—these details make all the difference between thriving plants and disappointing failures.
Lighting Secret: The 7-14 day window for cotyledons to appear is critical, but what happens after that is even more important. Place your seedlings under grow lights if natural light is insufficient—they need 12-14 hours of light daily to prevent leggy growth. I use a simple LED grow light on a timer for consistent results.
Thinning Technique: Don't wait until seedlings are crowded to thin them! Remove weaker seedlings when they're just 1-2 inches tall using clean scissors—this prevents competition and gives stronger plants more space to develop. I always leave about 2-3 inches between remaining seedlings to avoid future crowding issues.
Root Strength Test: That gentle tug test in Step 3 is your best indicator of transplant readiness. If roots resist but stems bend slightly, they're perfect. For extra confidence, check the soil ball when you remove a seedling—healthy roots should be white and dense, not brown or mushy. This simple test saves countless transplant failures.
Hardening Off Hack: The 4-6 hours of sunlight recommendation is perfect, but here's my pro move: start with just 2 hours of morning sun on day one, then gradually increase by 1 hour each day. This gradual exposure prevents sunburn while still toughening the stems. I also mist the seedlings lightly with water each morning during this period to keep them hydrated.
Pro Tips for Petunia Seedlings Images
- Here's what I've learned after growing dozens of petunia batches—these details make all the difference between thriving plants and disappointing failures.
- Lighting Secret: The 7-14 day window for cotyledons to appear is critical, but what happens after that is even more important.
- Thinning Technique: Don't wait until seedlings are crowded to thin them!
Frequently asked questions
Got questions about petunia seedlings?
Here are answers to the most common ones—from timing to troubleshooting—to help you grow thriving plants with confidence!
When should I transplant petunia seedlings?
Transplant petunia seedlings outdoors after the last frost when nighttime temperatures stay above 50°F (10°C). Seedlings should be 2-3 inches tall with 2-4 sets of true leaves (not just the first cotyledons). Harden them off for 5-7 days before moving them to the garden to avoid shock!
How long does it take for petunia seeds to sprout?
Petunia seeds typically sprout in 7-21 days, depending on warmth and moisture. Keep soil consistently moist (not soggy) and maintain temperatures between 65-75°F (18-24°C). If using light-dependent seeds (common in petunias), place the tray under a grow light for 12+ hours daily to trigger germination.
Why are my petunia seedlings leggy or weak?
Leggy seedlings usually mean too little light or overcrowding. Move trays to a sunny window or under grow lights (6-8 inches above seedlings). Thin them if they’re touching each other, and avoid overwatering—bottom-watering (placing trays in shallow water) helps prevent weak stems.
Can I use regular potting soil for petunia seedlings?
While you can use standard potting mix, petunia seedlings thrive in a light, well-draining blend. Mix 50% potting soil with 50% perlite or vermiculite to improve aeration. Avoid heavy garden soil—it compacts easily and can cause damping off (a fungal disease). A seed-starting mix is ideal!
What should I do if my seedlings develop black stems or mold?
This is damping off, caused by overwatering or poor airflow. Stop watering immediately and let the soil dry slightly between waterings. Improve airflow with a small fan (run it lightly 24/7) and remove affected seedlings. Use a fungicide spray (like neem oil) if needed, and sterilize trays with a 10% bleach solution before reuse.
Are there faster-growing petunia varieties for seedlings?
Yes! Grandiflora and Multiflora petunias germinate slightly faster than Milliflora types. For quickest results, choose heat-tolerant hybrids (like Supertunia) or buy transplants from nurseries. If starting from seed, pre-soak seeds in warm water for 24 hours to speed up germination.
Wrapping up and next steps
Growing petunia seedlings is a rewarding journey, and recognizing healthy stages through petunia seedlings images ensures your blooms thrive! 🌱 From sturdy stems to vibrant leaves, each milestone brings you closer to a stunning garden.
Now that you’re equipped with tips and answers, it’s time to take action—grab those seedlings, prepare your garden beds, and watch your petunias flourish!
Ready to transplant? Start by choosing the right moment—early morning or late afternoon—and give your petunias the love they deserve. Happy gardening! 🌸