
Transplanting
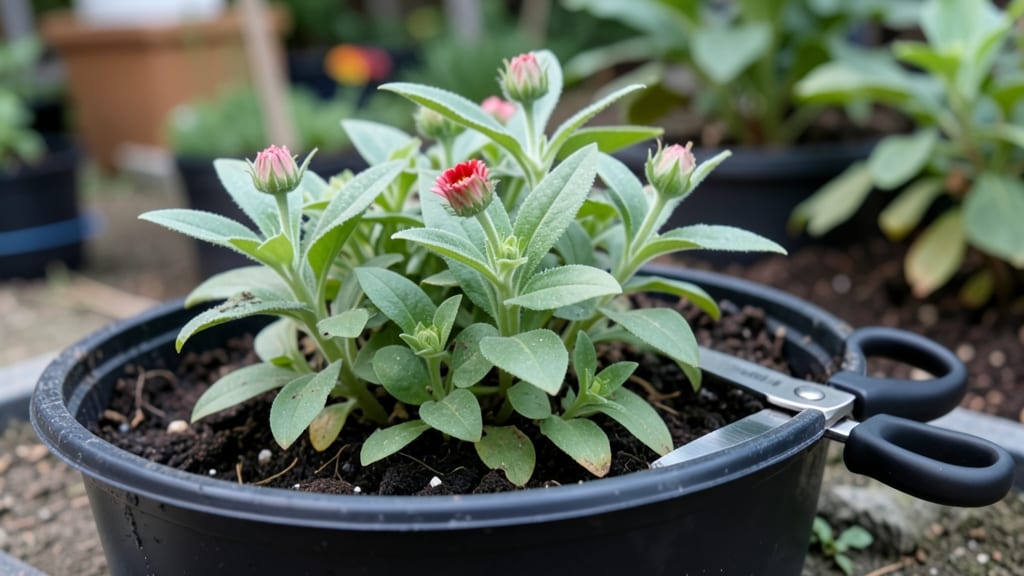
Pinching zinnia seedlings isn’t just a trick—it’s the secret to plants that explode with color instead of stretching tall and leggy. 🌻 I learned the hard way when my first batch flopped into skinny stems and sparse blooms, but after mastering this simple technique, my zinnias now look like they’re competing in a floral parade.
The key? Pinching at the right time with the right confidence—no guesswork, just stronger stems and bushier blooms.
You only need two things: clean, sharp scissors or your fingers, and 10 minutes of focused attention. Wait until seedlings have 4-6 true leaves (not just the initial seed leaves) and are about 6 inches tall—this is when they’re ready for their first pinch.
The goal is to encourage branching by removing the top growth, but don’t go overboard; a quarter-inch above a leaf node is perfect. Most gardeners pinch once, but repeat every 2-3 weeks for continuous bushiness.
What you’ll end up with is a zinnia plant that’s thicker, sturdier, and packed with blooms—some varieties produce 50% more flowers after pinching. The stems won’t flop in wind or rain, and the plants will keep flowering until frost.
Plus, the flowers themselves stay larger and more vibrant, making them the star of any summer border. Ready to transform those scraggly seedlings into showstoppers?
Here’s the thing—if your seedlings don’t respond well, you’re probably pinching too late or too aggressively. Start early, and don’t cut into the stem; always pinch just above a leaf node where new growth can sprout.
And if you’re worried about disease, use sterilized tools or simply pinch with clean fingers. The results speak for themselves: stronger plants, more blooms, and a garden that turns heads.
📚 In This Guide
- What you need
- Instructions
- Tips and common mistakes
- Wrapping up and next steps
What you need
- ● Zinnia seedlings: Healthy, 4–6 inches tall (with at least 4–6 true leaves)
- ● Clean, sharp pruning shears or scissors: Disinfected with rubbing alcohol to prevent disease
- ○ Gloves (optional but recommended): To protect hands from thorns or dirt
- ● Watering can or spray bottle: For post-pinching hydration (avoid soaking the stems)
- ● Garden journal or notepad: To track pinch dates and progress
- ● Growth hormone powder (e.g., rooting hormone): For dipping cuttings if propagating
- ● Plant markers: To label pinched seedlings if testing different techniques
- ● Lightweight row cover or shade cloth: For temporary protection post-pinching (if in hot climates)
- ● Magnifying glass: For spotting tiny leaves or buds needing attention
- ● Outdoor temps are consistently above 50°F (10°C) (no frost risk)
- ● Plants are actively growing (not dormant or stressed)
- ● Weather is overcast or early morning (reduces transplant shock)
How to pinch zinnia seedlings for maximum fullness
This simple technique transforms spindly seedlings into sturdy, bushy plants bursting with blooms.
🌱 Step 1: Wait for the Right Growth Stage
Pinch zinnia seedlings only when they've developed 4-5 true leaves—those are the second set of leaves that appear after the initial cotyledons. You'll recognize them by their mature shape and darker green color compared to the first small leaves. The plant should also be about 4-6 inches tall with a sturdy stem.
Here's the thing—pinching too early stunts growth, while waiting too long means the plant wastes energy growing tall before you shape it. I always check the underside of the leaves for small side buds forming at the joints; that's your signal the plant is ready.
✂️ Step 2: Use Clean Tools and Make the Pinch
Grab your sharp pruning shears or clean fingers and locate the spot just above the set of leaves where the 4th or 5th leaf meets the stem. This is your pinching point. For a cleaner cut, I use sterilized shears dipped in rubbing alcohol to prevent disease transmission between plants.
Make your pinch with a single, decisive snip or pinch—don't crush the stem. You're removing the top growth to encourage lateral branching. The goal is to leave about ⅓ of the plant's height remaining. You'll see new side shoots emerge from the leaf axils within 7-10 days.
🌿 Step 3: Monitor and Repeat for Bushier Growth
After the first pinch, keep an eye on your zinnia seedlings. They'll start developing secondary stems from the leaf joints below where you pinched. Once these new stems reach about 3-4 inches tall and have developed 2-3 sets of true leaves, it's time for a second pinch on each of these new growth points.
Real talk: Don't pinch more than 2-3 times total per plant. Over-pinching stresses zinnia seedlings and delays flowering. You'll know you've done it right when your plants look like miniature bushes instead of single-stemmed stalks.
☀️ Step 4: Provide Optimal Conditions for Recovery
After pinching, your zinnia seedlings need bright light for 6+ hours daily to recover quickly. Move them to a sunny windowsill or under grow lights if needed. The plants will temporarily slow their growth as they redirect energy into developing lateral branches instead of just vertical height.
Water consistently but don't overdo it—keep the soil evenly moist but not soggy. You'll see new growth emerge within 5-7 days if conditions are right. This is when the magic happens: what was a single stem becomes a multi-branched plant capable of producing dozens of blooms.
💧 Step 5: Maintain Through Flowering
Once your pinched zinnia seedlings establish their bushy structure, focus on regular deadheading to encourage continuous blooming. Remove spent flowers by snipping the stem just above a set of leaves. This prevents the plant from setting seed and redirects energy into producing more flowers.
I always fertilize lightly with a balanced formula after pinching to support the new growth. You'll be rewarded with fuller plants and more abundant blooms throughout the season. The key is patience—pinched zinnia seedlings take about 3-4 weeks to show their full bushy potential, but it's worth the wait for that dramatic transformation.
Tips & tricks for pinching zinnia seedlings
Transforming those leggy zinnia seedlings into lush, flowering bushes takes more than just a quick snip—it's about understanding the plant's growth patterns and giving it the right support. Here's what I've learned after watching dozens of zinnia seedlings go from spindly to spectacular.
Timing is Everything: The 4-6 inch height and 4-5 true leaves benchmarks in Step 1 are non-negotiable. I've seen gardeners pinch too early and end up with stunted plants that never recover. Look for those small side buds forming at the leaf joints—this is your plant's way of saying "I'm ready!" These buds will develop into your new lateral branches after pinching. If you're unsure, wait a day or two rather than risking premature pinching.
Precision Pinching Technique: When you make that first pinch just above the 4th or 5th leaf in Step 2, aim for clean cuts rather than crushed stems. I use sterilized shears for consistency, but clean fingers work too if you're careful. The key is removing just the top growth while leaving about ⅓ of the plant's height remaining. This creates the perfect balance—enough leaf surface for photosynthesis while redirecting energy to those dormant side buds. Don't be tempted to pinch lower on the stem; you'll remove too much growing power.
Recovery Conditions Make All the Difference: After pinching, those 6+ hours of bright light daily mentioned in Step 4 become absolutely critical. I've had plants where I skipped this step, and they just sat there looking sad for weeks. The light triggers the photosynthesis needed to fuel that new lateral growth. Pair this with evenly moist but not soggy soil, and you'll see those first new shoots emerge within 5-7 days. Pro tip: If your seedlings are in containers, rotate them daily to ensure even light exposure all around.
Visual Cues for Success: You'll know you've done it right when you see those secondary stems from Step 3 starting to form within 7-10 days. These new growth points should be about 3-4 inches tall before you consider a second pinch. Look for them to develop 2-3 sets of true leaves—this indicates they're strong enough to handle another pinching. The transformation from single-stemmed stalk to bushy plant happens gradually, but it's worth the patience. Remember, you can only pinch each plant 2-3 times total, so make each pinch count.
Pro Tips for Pinching Zinnia Seedlings
- Transforming those leggy zinnia seedlings into lush, flowering bushes takes more than just a quick snip—it's about understanding the plant's growth patterns and giving it the right support.
- Timing is Everything: The 4-6 inch height and 4-5 true leaves benchmarks in Step 1 are non-negotiable.
- Precision Pinching Technique: When you make that first pinch just above the 4th or 5th leaf in Step 2, aim for clean cuts rather than crushed stems.
Frequently asked questions
Got questions about pinching zinnia seedlings? You’re not alone—this technique can feel tricky at first! Here are answers to the most common concerns to help you grow bushier, stronger zinnias with confidence.
When is the best time to pinch zinnia seedlings?
Pinch zinnia seedlings when they’re 6–8 inches tall and have 4–6 true leaves (not just the initial seed leaves). This usually happens 4–6 weeks after germination, depending on your climate. Avoid pinching too early—young plants need all their energy to establish roots.
How much should I pinch off?
Remove the top 1–2 inches of growth, just above a set of leaves where new branches will sprout. Think of it like trimming a bush: you’re redirecting energy from vertical growth to side shoots, which will later become flower stems. Use clean, sharp scissors or fingers for a clean cut.
What if my zinnias bolt (flower too early) after pinching?
Zinnias may bolt if they’re stressed, overcrowded, or exposed to heat after pinching. To prevent this:
- Water consistently (keep soil moist but not soggy).
- Space seedlings 12–18 inches apart for airflow.
- Avoid pinching in extreme heat—wait for cooler mornings.
Can I pinch zinnias grown from seed too late?
Yes, but results may be less dramatic. Pinching works best when done early, but you can still try it on taller seedlings (up to 12 inches). Just be patient—later pinches may produce fewer but larger flowers. If your plants are already flowering, skip pinching and enjoy the blooms!
What’s an alternative if I don’t want to pinch?
If pinching feels overwhelming, try these low-maintenance alternatives:
- Thin seedlings early to reduce competition (leave the healthiest 2–3 plants per pot).
- Use dwarf zinnia varieties (like ‘Thumbelina’), which naturally stay bushy.
- Plant closer together (8–10 inches apart) to encourage natural branching.
Wrapping up and next steps
Pinching zinnia seedlings is a simple yet powerful trick to unlock bushier plants and vibrant blooms—no green thumb required! 🌸 By encouraging lateral growth and stronger stems, you’ll soon enjoy a garden bursting with color.
Now that you’re armed with the know-how, grab those shears and get pinching—your zinnias will thank you!
Ready for the next step? Monitor your plants weekly and adjust pinching as they grow. Soon, you’ll be the proud gardener of a zinnia powerhouse!